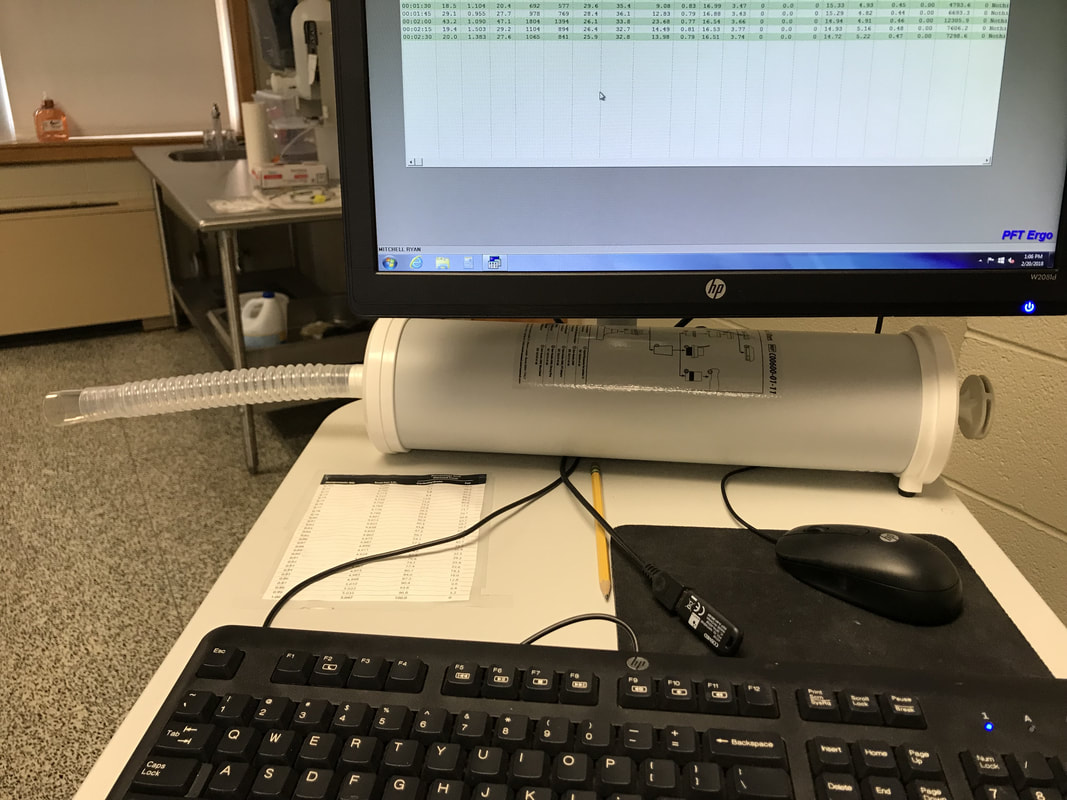
 The white cylinder under the computer is the flowmeter used to detect O2 consumption and CO2 release. The computer shows how the data file looks like. Before actual operation to test the oxygen consumption and carbon dioxide production of the subject, calibration test and gas test is required. The gas cylinder contains O2 and CO2 with labelled concentration on the cylinder. The controlled test results will show the concentration the metabolic cart detects. (Remember to switch on the cylinder when in usage, and switch off when done.) My mentor first introduced me with the metabolic cart and the instructions to use it. Procedure: 1. Turn on the metabolic cart to warm up for 15 minutes 2. Put on flowmeter turbine and mask for the subject. (28 mm or 18 mm for the flowmeter) 3. Run a calibration test. 4. Turn on the gas cylinder, run a gas test. 5. Measure the subject's heigh and weight. Get the basic information of age, gender, etc. 6. Attach the flowmeter to the flowmeter cylinder (transparent, plastic) and screw the other side of the flowmeter to the subject's mask (where the mouth is). Double check if the flowmeter stays stable. 7. Have the subject go on bike/ run/ exercise and start testing for a time range. 8. Go to "edit test" to see the results and compare the VO2 and VCO2 with intensity. The metabolic cart was a big progress in my internship today, but another surprising news is that we might change our research from finding the correlation between VO2 max and LT to studying the "TruGrit Tea" that The Whistling Kettle just launched. The TruGrit Tea is examined to provide more energy with less caffeine and more nutrients it contains. Because the examination only includes "energy effects" vs time graph and experiments, my mentor and I proposed the idea to study the "fatigue time" that the TruGrit Tea has in comparison to other ordinary tea. The "fatigue time' is the duration that an athlete or subject starts exercising to feeling tired and fatigues. We thought that it would be wonderful to support the TruGrit tea if its energy provided is better to sustain the duration than other tea. Thus, we contacted the owner of The Whistling Kettle, Mr. Borowsky, for further information. Mr. Borowsky generously supported our idea and would provide us the TruGrit tea and a controlled tea (tastes similar but without all the ingredients that TruGrit tea contains) for our study. The internship today was unexpectedly progressive. Our initial plan for the TruGrit tea research is listed as below: 1. Let the subject be warmed up and ready to workouts. 2. Let the subject has a cup of TruGrit tea and continues working out, with the metabolic cart testing. 3. Measure the fatigue time. 4. Let the subject rest and has a cup of the controlled tea and continues working out, same with the metabolic cart testing. 5. Measure the fatigue time. 6. Graph the data to compare the fatigue time with the TruGrit tea and the controlled tea to check if the TruGrit tea increases the fatigue time.
1 Comment
Analysers we found today:
Analox GL5 (costly) Lactate Pro (available outside of US) Super GL Ambulance (costly) Photometer Analyzer (available outside of US) The internship today was mostly researching and finding other analyzers that are affordable and more accurate. We contacted the company of analox distributor and learned that the analyzer costs around $10,000, which is more than what our budget can afford, and that the company had also gotten many comments about the inaccuracy of Lactate Plus meter and other portable analyzers. We were quite disappointed that there is not other accurate and affordable analyzer we can purchase. Hence, we decided to test the lactate plus meter again with controlled solution and fingertips. Nevertheless, nothing much had changed. The controlled solution test was within the range of 1.0 mmol to 1.6 mmol, but the fingertips test was way off from 1.4 mmol to 2.3 mmol. My mentor and I discussed the possibility of changing the direction of our study, since both of us did not want to abide by the great variability. Going along with the obstacle of accuracy we were facing, we decided to try earlobe testing instead of fingertip testing, hoping that it would improve the accuracy.
We basically did the same preparation and followed the same protocol as the fingertip testing, except for changing the depth and intensity of lancets since earlobes were much thiner than fingertips. The earlobe testing was, in a way, scary because my blood would not stop bleeding, and I could not see the process of poking and collecting samples. The wounds for earlobes were surprisingly more visible and bigger than the fingertip wounds even though we decreased the depth and intensity. As expected, it was easier to collect blood samples of earlobes because the skin was thin, which helps to poke the capillaries. Both Andrew and I were tested; nevertheless, the results still had 30% of variability that we were not satisfied of. Further research on previous articles were done, and we found that Dmax method and BSX Insight calf sleeve were both methodologies that other studies used. However, Dmax method is used to calculate lactate threshold, so lactate concentration measurement is still needed. BSX Insight is a recent technique that is primarily used in athletes, rather than studies. Thus, we decided to stay with the Lactate Plus meter we have now and see if there is other analyzers we can afford and get as soon as possible. Continuing on the lactate concentration measurements...
My mentor, Dr. Mitchell, Andrew, and I ran triple controlled solution tests to the Lactate Plus meter accuracy. While the results were within 10% difference, our measurements from last testing were odd and became a difficulty for us to figure out why the results went wrong. We followed the instructions and tested Andrew's right hand fingers again for the resting period. I was another subject to test my lactate concentration, too. However, we attained measurements within a wide range of 1.3mmol to 2.5mmol and 0.9mmol to 3.2mmol of lactate concentration, which were disappointing and frustrating. To check the body conditions and if it's just that lactate is challenging to measure, we used glucose meter to take samples for Andrew and I. The outcomes had about 5% difference, suggesting that the glucose meter was accurate and the body conditions were stable. Consequently, we started researching on other methodologies of lactate concentration testing. Lactate Pro was considered the most popular due to its reliability and affordability, but it was only available outside of the US. Some other analyzer were expensive such as Analox GL5 that costs up to 10,000 dollars. With the budget restriction, we were experiencing a hard time to decide if we should just accept the big fluctuation of the Lactate Plus meter or to purchase other equipment. Dr. Mitchell, my mentor, introduced his graduate student Andrew Clifford to be our first subject for lactate threshold measuring experiment.
Main Component: Our protocol is to follow what is considered the best time interval (4 min) for each speed pace, and the pace depends on the subject's fitness. 1. Measure lactate concentration of the subject when standing. Warm up at about 4 mph for 6 min. 2. Run on the treadmill at 5 mph for 4 min. 3. Get 30 seconds of rest while measuring lactate concentration of the subject. 4. Increase the intensity of pace by 1 mph, which is now 6 mph for 4 min. 5. Repeat step 3 and 4 until the subject has six data points. 6. Graph the data points and use a smooth, curve line to determine the lactate threshold. Difficulties: We faced the inconsistency problem again today, with the subject having 2.0, 1.0, 4.6, 4.7, 1.8, 1.0, 1.9, 1.1 mmol of lactate while standing. The discrepancy is hard to avoid, so we tried to minimize the exposure of test trips to air, reduce the time for each trial, and checking the cleanness of the poking sites. Due to the lack of time and insufficient test strips, we did not start official treadmill testing. We hope to catch up to our plan next time. I started collecting my own lactate concentration data samples to be further examined for exercise use and also to solve the accuracy issue. This time, I used alcohol swab to thoroughly clean the poking site to prevent inaccuracy. The data collection began with my index finger as the poking site, and I was measuring the lactate concentration by myself while writing down the data. Thus, it was difficult for me to clean my hands, poke my own finger, get enough blood drop to fill the well on the strip, and to record the data at first, but with more practices and trials, I became familiar to conducting the measurement by myself only. I tested my index finger with seven trials of similar area and obtained the results of 1.6, 1.1, 1.1, 0.4, 0.5, 1.1, and 0.7. My mentor and I thought that the discrepancy was still to large to be accurate, so we called the technical support of the lactate plus meter company to seek for help. The technician suggested that we should not test the same finger over time, instead, different fingers would reveal the actual lactate concentration. Also, check the lactate plus meter with control solution every time before we run the experiment. Therefore, we tried three other trials of my middle finger, ring finger, and my pinky. The data are relatively close and accurate: 1.0, 0.8, 0.8. WHY USE DIFFERENT FINGERS? I did not ask the technician the reasons to use different fingers for lactate concentration measurement (partially because she did not really know how to explain), but I was curious about the cause. One of the reasons that came to my mind was that capillaries on fingers were damaged when I poked my finger for the first time, and the exposure to air and hypothetically contaminated site would affect the test strip measurement. TIPS for measuring lactate concentration: Test the lactate plus meter with control solution before collecting data. Use different fingers for measurement. Clean the sites thoroughly with alcohol swab and soap, dry with paper towel. Stay warm. 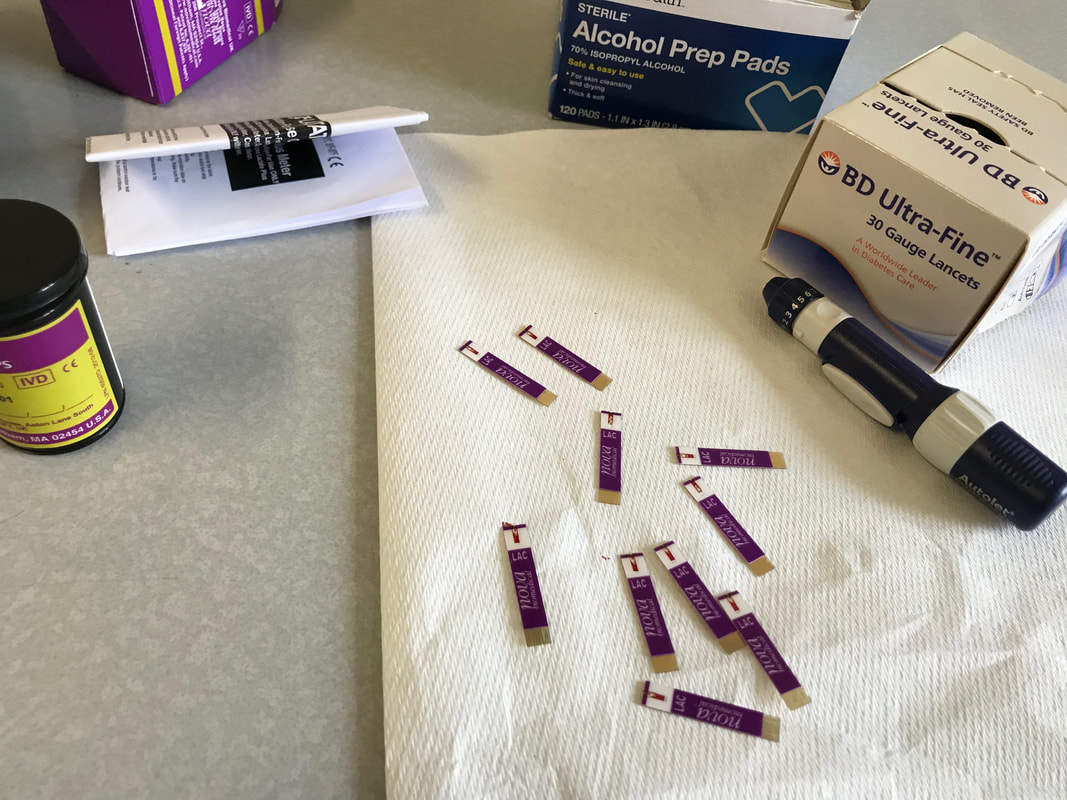 My fist internship officially started today at The Sage Colleges in Troy. My mentor, Dr. Mitchell, first introduced the goal of the project--investigating the correlation of VO2max and lactate threshold, and we began to collect lactate concentration samples. Equipment: The equipment we used included lactate plus meter, lactate test strips, two control solutions, lancet holder and lancets. Steps: We followed the manual instruction to collect data samples, but we did not prepare alcohol swab that was supposed to be used to clean the site. 1. Remove the protective cover and place a lancet into the lancet holder. Remember to change the lancet every time the subject is changed. 2. Adjust the depth setting and wash the poking site thoroughly with soap. 3. Dry the poking site with paper towel, stay warm, and massage the finger with it pointing downward to stimulate the blood flow. 4. Turn on the lactate plus meter and place a lactate test strip into the meter, be ready to get sample tested. 5. Run a test with the control solution to examine the accuracy of the lactate plus meter. 6. Use the lancet device to poke at a site of the finger, wipe the first drop of blood out since it may be contaminated, and gently massage the finger to get a second drop of blood. 7. Put the strip well close to the site and let the blood fill the well. 8. The meter will start beeping, meaning that it is processing, and wait for 13 seconds for the result. Accuracy and Problems: We wanted to double-check the accuracy, so we tested the same finger again and again, expecting a similar measurement of lactate concentration. However, the outcomes were not close at all with a wide range from 3.5, 2.1, 2.9, 2.3 to 1.7. We changed the finger sites from left hand index finger and ring finger to right hand index finger and ring finger as well, so we considered that as another variable affecting the data. Insufficient cleaning of not using alcohol swab might be another factor, so did the chilly cold lab temperature (57 degrees F) Conclusion: To resolve the accuracy issue, we decided to use the same finger of the same hand every time, get warmed up completely, and to clean the fingers with alcohol swab. 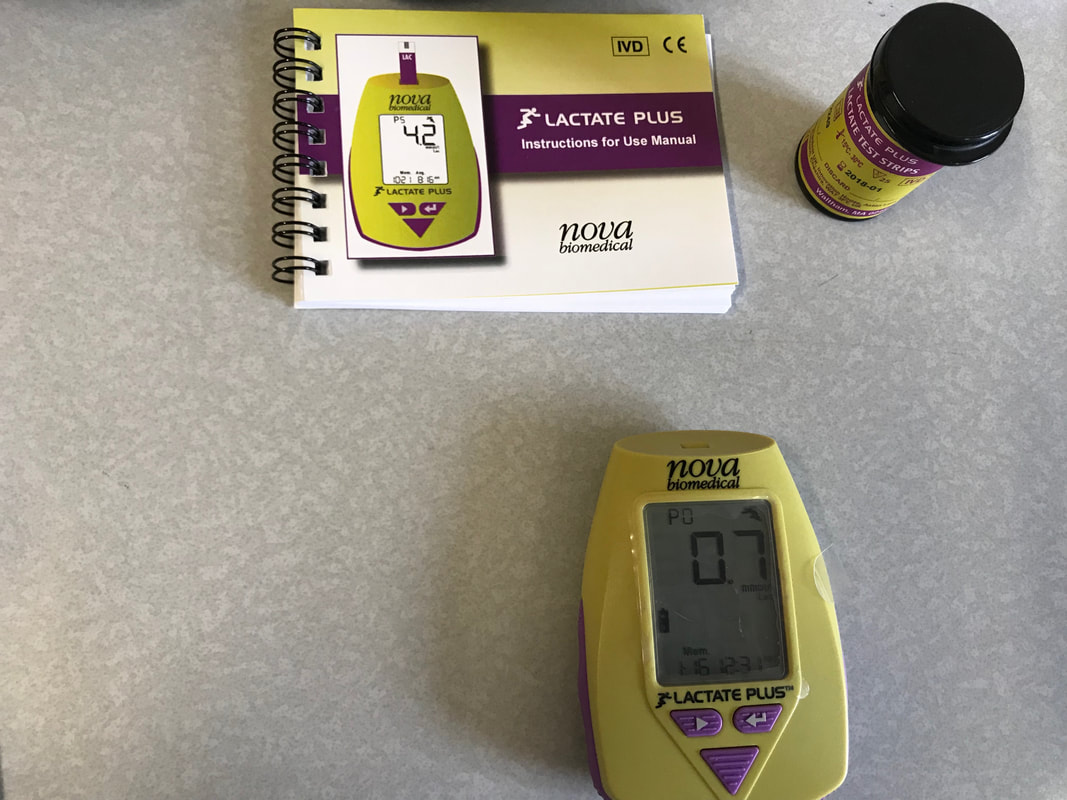 Since my mentor and I haven't discussed our testing protocol to determine and measure lactate threshold in our subjects, I decide to research on more information of how other researchers and athletes measure lactate threshold.
According to the "Lactate Threshold Testing Protocol" article by Elkhart Valley Cycling Club, lactate threshold measurement is a key element in examining and improving athlete performances because higher lactate threshold indicates more energy produced. Testing protocol with treadmill is listed as below: Warm up for about 15 minutes, and determine an optimal starting pace. Set the treadmill to a 3% incline, and with every 90"
Use the lactate meter to get blood sample to measure the lactate concentration for each interval, right before where lactate concentration stays about the same (gets terminal) is the lactate threshold. This is a sample of treadmill testing protocol, but my mentor and I will develop and advance another version of protocol that is more helpful for our experiment. RECAP: How is lactate produced?
Lactate is produced after glycolysis in the process of fermentation, and promptly becomes lactic acid by binding to a hydrogen ion. If glucose is broken down to pyruvate at very high rate, pyruvate begins to accumulate inside muscle cells, and lactic dehydrogenase convert pyruvate to lactate. Q: Is lactate a bad thing?
MYTH: Lactate can not be cleared out? Lactate is rapidly removed form blood once it appears, and lactate level does not rise as high as glucose concentration does because of its constantly buffer. TRUTH: Lactate is helpful for human body. Citation: How increasing your lactate threshold will improve your fitness and performance, Lactate Threshold Article, Owen Anderson, 2017. Due to the busy schedule of my mentor, my mentor and I will not start our research until second semester starts. Therefore, I am learning more about the topic to be prepared of the research.
Before asking the question of what lactate threshold is, we need to know what is lactate acid. How is lactic acid formed? Human bodies perform cellular respiration to obtain energy from fuel molecules every second in their life time, with the aid of oxygen. Once oxygen is absent in the process of cellular respiration, cells undergo fermentation to attain energy stored in ATPs from fuel molecules. Anaerobic fermentation produces lactic acids and ATPs from fuel- molecule dissociations. Lactic acids are waste products created in fermentation when oxygen is absent. What is lactate threshold? Lactate threshold is the blood lactate concentration at a point where lactate begins to accumulate, and the action of clearing and metabolising lactate can no longer keep up with lactate production. Lactate will accumulate in muscles and will often cause the soreness of muscles. Lactate threshold is known as an indicator of the exercise intensity: if lactate threshold is high, the person can continue exercising in aerobic process with great persistence. How to determine lactate threshold? The most accurate method is using calorimetry to determine the lactate concentration in the blood. What is anaerobic threshold? Anaerobic threshold is the stage where a person has to switch from aerobic to anaerobic metabolism. "During anaerobic metabolism, the body burns stored sugars to supply the additional energy needed, and lactic acid is produced faster than it can be metabolized." (http://www.concept2.com/indoor-rowers/training/tips-and-general-info/anaerobic-threshold) How to determine anaerobic threshold? Anaerobic threshold can be determined using indirect calorimetry to detect the oxygen consumption and carbon dioxide release. The difference between lactate threshold and anaerobic threshold is the next question I want to clearly distinguish the two, as well as researching which threshold is more beneficial for running. |
AuthorClass of 2019 at Emma Willard School. Archives
May 2018
Categories |

 RSS Feed
